There is a drawing name CannedCycleSample1.dwg which contains knowledge for each of the cutting methods shown above. You can use Retrieve Knowledge to look at or export these sample knowledges into your own drawings.
You can download the drawing here..
The sample has several holes drawn on it and you can cut any or all of them with the sample knowledges to get a feel for the way the cycles work. Geoshape as many holes as you want and select from the two knowledges included to test the drill cycles. In this example, only the large holes will be cut with the Spot Bore knowledges.
In order for Canned Cycles to work properly, you MUST group the holes together.
Grouping
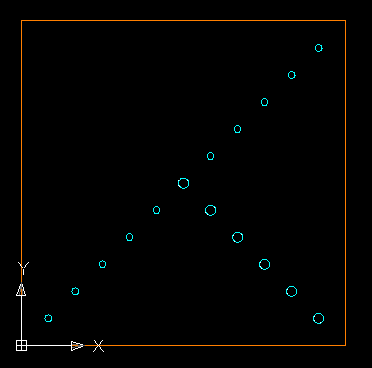
To group the holes together for Canned Cycles, you first geoshape the holes you wish to cut. The drawing will then look like this:
After the holes are geoshaped, select Group from the Control Panel (at the bottom where all the buttons are).

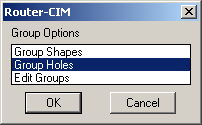
Once you select Group, you will be prompted to Group Shapes, Group Holes, or Edit Groups. Select Group Holes.
Sorting the Holes...The Easy Way
There are two ways to deal with grouping selected holes. The first way to sort the items is to let Router-CIM assist you in picking the circles of the size you want to cut.
Select OK to the above window and you will be in the drawing, with a Select Object prompt. Pick ALL the circles in the drawing and then press Enter. You will see a window like this:
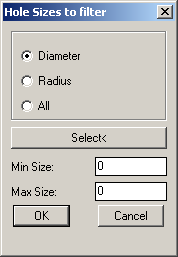
Pick on the 'Select' button, and you will be prompted back in the drawing to Select Objects. Pick any one of the large circles. The window will return like this:

with the Min Size and Max Size set to 0.375. That is the size of the circles we want to cut with this cycle. Router-CIM will filter out only the circles that match this size. For instances where your circles might vary slightly, but you want to use the same tool, you could enter a Min Size and a Max Size within the range you want to select.
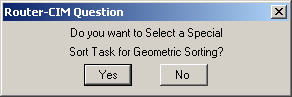
Press OK, and you will be prompted
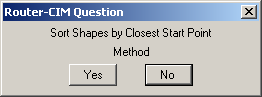
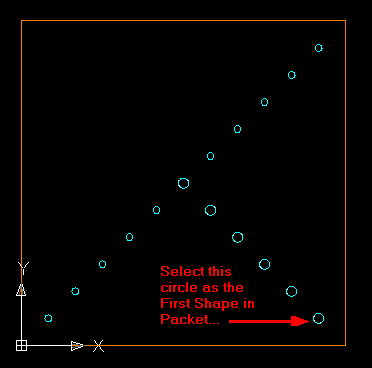
Select YES and then pick the circle in the Lower Right Corner as the First Shape in the Packet.
You will then be shown a window asking if you want to select any other sorting tasks.
Select NO.
The Holes will then appear RED and will have a muli-colored ribbon next to them like this:
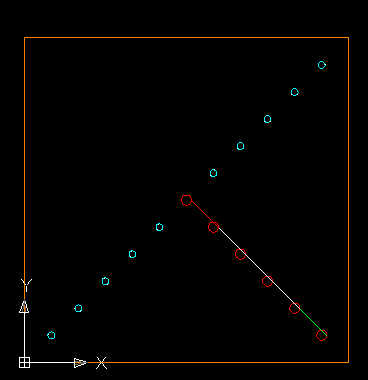
The Green part of the ribbon shows you where the group will start, the White part shows you which holes are next and the Red section shows you which shape is last in the group. In this instance the holes will be cut like this:
Sorting the Holes...The Other Easy Way!
There is another way to deal with grouping selected holes. The first way to sort the items is to let Router-CIM assist you in picking the circles of the size you want to cut. The second way is to simply pick the holes in the order you want them to cut. If the drawing is not too large or complicated, this might be a little faster, but not much...
After you first geoshape the holes you wish to cut. The drawing will then look like this:
After the holes are geoshaped, select Group from the Control Panel (at the bottom where all the buttons are).
Once you select Group, you will be prompted to Group Shapes, Group Holes, or Edit Groups. Select Group Holes.
Select OK to the above window and you will be in the drawing, with a Select Object prompt. Pick only the circles you want to cut. In this case the larger circles in the drawing. Then press Enter. You will see a window like this:
Pick on the 'Select' button, and you will be prompted back in the drawing to Select Objects. Pick any one of the large circles. The window will return like this:
with the Min Size and Max Size set to 0.375. That is the size of the circles we want to cut with this cycle. Router-CIM will filter out only the circles that match this size. For instances where your circles might vary slightly, but you want to use the same tool, you could enter a Min Size and a Max Size within the range you want to select.
Press OK, and you will be prompted
Select YES and then pick the circle in the Lower Right Corner as the First Shape in the Packet.
You will then be shown a window asking if you want to select any other sorting tasks.
Select NO.
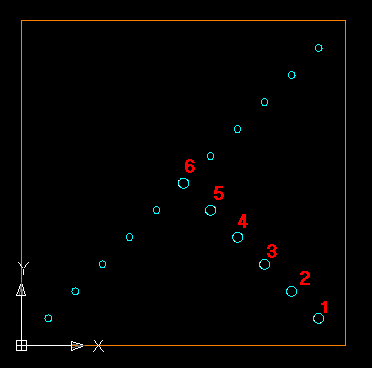
The Holes will then appear RED and will have a muli-colored ribbon next to them like this:
The Green part of the ribbon shows you where the group will start, the White part shows you which holes are next and the Red section shows you which shape is last in the group. In this instance the holes will be cut like this:
Cutting the Holes with Spot Bore
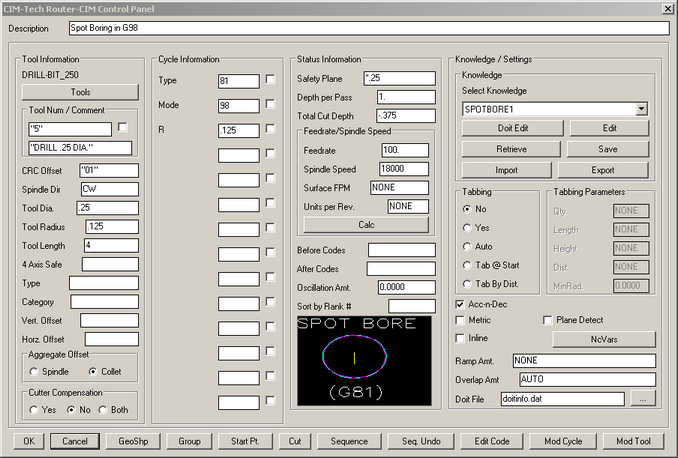
Once the holes are grouped together, you can then make the Spot Bore tool paths. Select the SPOTBORE1 knowledge from the knowledge pull down list.
Next Select the Cut button, and pick on ANY hole in the Group you just made. Since the circles are one group, picking any hole selects the entire group, and all the holes are cut like this:
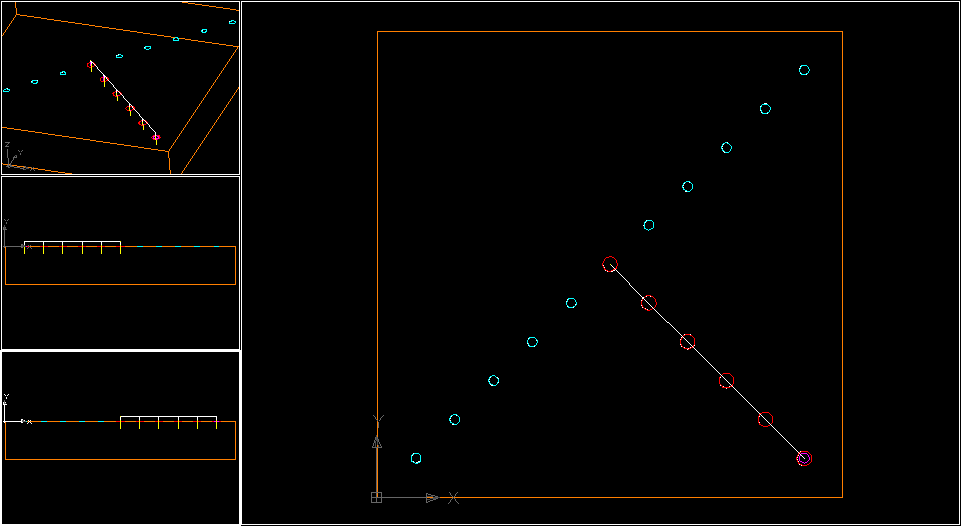
You can see from the different viewports that only the holes that were grouped were actually cut, and the holes were cut all to one depth. You can see the purple circle on the first hole. That is the start of the group. All of these cuts are one piece and cannot be picked individually or in any other order during sequence.
Making Code and Checking the Z values
In order to get code now, all you need to do is select Sequence and pick on the group of drilled holes and you will get the following code:
%
:1234(CANNEDCYCLETEST1)
N1G00G17G20G28G40G80G91Z0M5
N2G90
N3G52X0Y0Z0
N4G08P1
N5M08
N6(DRILL .25 DIA.)
N7G28G91Z0M05
N8G90T2005M06
N9T102
N10M03S18000
N11G00G17G55X11.Y1.
N12G00G43H5Z.25
N13G98G81Z-.375R.125Q1.F100.
N14X10.Y2.
N15X9.Y3.
N16X8.Y4.
N17X7.Y5.
N18X6.Y6.
N19G80
N20G28G91Z0M5
N21G28G91X0M09
N22G90
N23G52X0Y0Z0
N24G08P0
N25M30
%
The holes are cut in one pass, to Z-.375. Assuming Z0.0 is the top of the material. If you use Z0 as the top of the Spoilboard, change your knowledge so that the Total Cut Depth is .375 instead of -.375 and the code will look like this:
%
:1234(CANNEDCYCLETEST1)
N1G00G17G20G28G40G80G91Z0M5
N2G90
N3G52X0Y0Z0
N4G08P1
N5M08
N6(DRILL .25 DIA.)
N7G28G91Z0M05
N8G90T2005M06
N9T102
N10M03S18000
N11G00G17G55X11.Y1.
N12G00G43H5Z1.
N13G98G81Z.375R.125Q1.F100.
N14X10.Y2.
N15X9.Y3.
N16X8.Y4.
N17X7.Y5.
N18X6.Y6.
N19G80
N20G28G91Z0M5
N21G28G91X0M09
N22G90
N23G52X0Y0Z0
N24G08P0
N25M30
%
Since Canned Cycles are a text based cycle, the Z value in the code is really just the Z value from the knowledge. The same is true of the Mode, Type, and R values from the cycle.
The sample knowledges contained in the drawing are:
SPOTBORE1
SPOTBORE2